 WriterMorph
Help › Timeline
The Writer Timeline
See your story's shape with the Plot Board, Outline, Timeline lanes, Flat grid, Cast and Place maps, the tension curve, Book Stats and the Story Map.
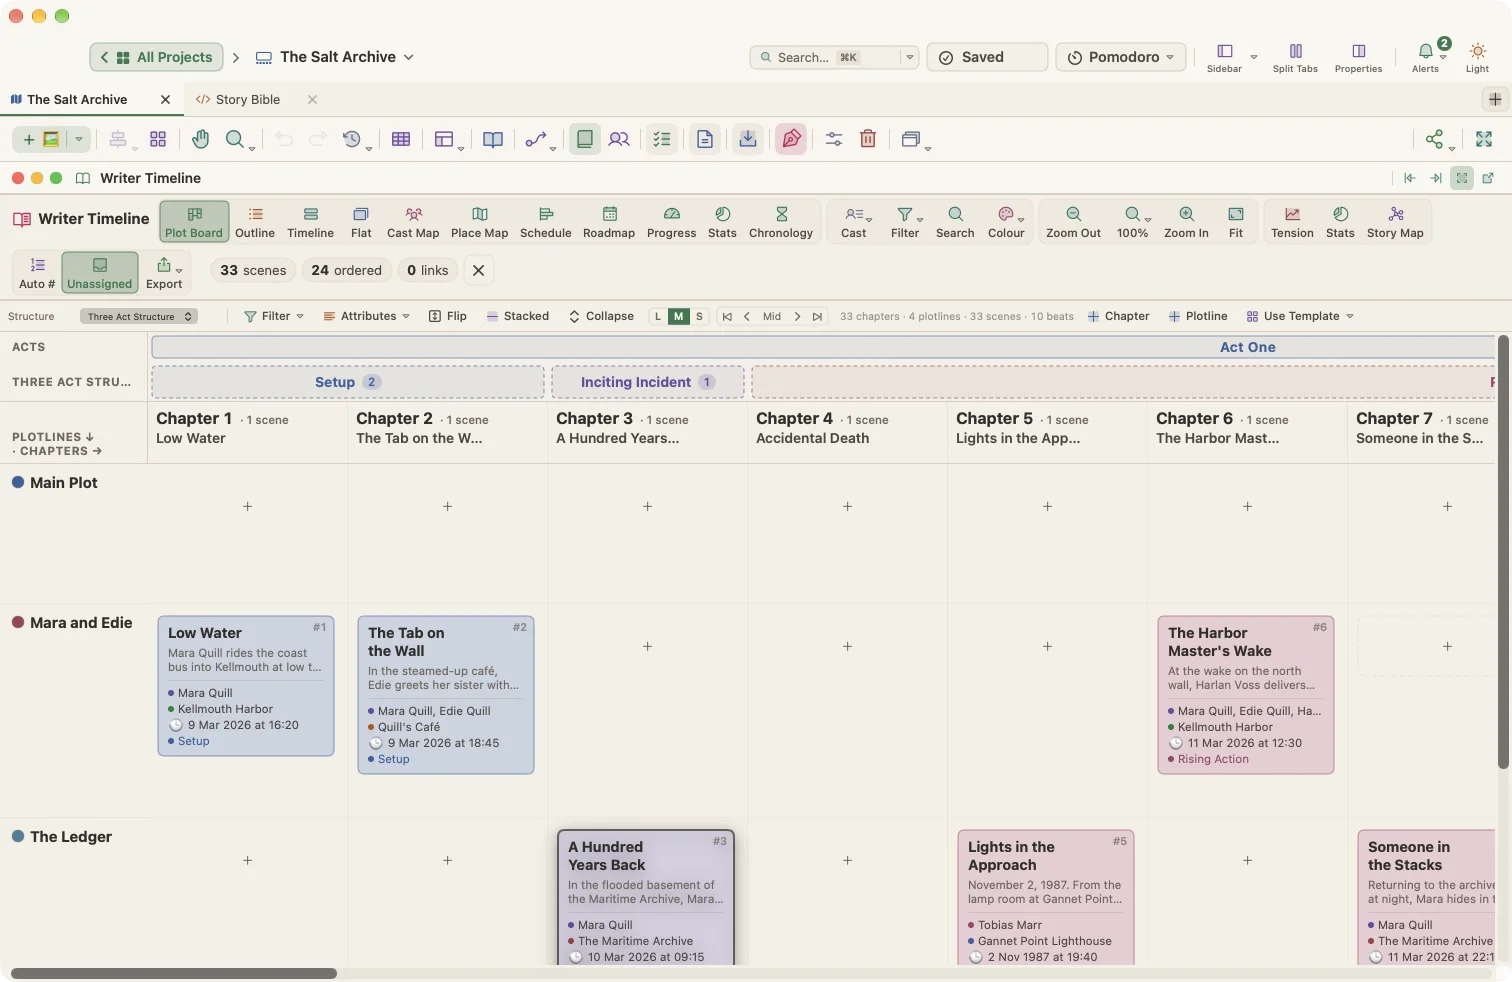
The Writer Timeline turns your scene cards into a set of story views. It reads the same cards as the canvas and the binder, so every change you make here is a change to your project.
Opening it
- Choose View › Writer Timeline or press ⌥⌘T.
- The Writer Timeline needs Author mode, which turns on the story tools: characters, places, scene types, beats and tension. Fiction and script templates turn it on for you. For other projects, turn it on in Project › Project Settings… under Canvas › Writing, or with the Author button in the planner toolbar.
The timeline opens as a panel. Like other WriterMorph panels, you can center it, dock it left or right, float it in its own window, or minimize it.
Not a novelist? In non-fiction, academic, student and work projects, the same panel becomes a project timeline with planning views. In a student project it is called the Study Planner; in an academic project, the Research Timeline. See Project views below.
Story views
Switch views with the buttons at the top of the panel:
| View | Shows |
|---|---|
| Plot Board | Chapters across, plotlines down, with your scenes in the cells |
| Outline | Chapters and scene summaries as readable prose |
| Timeline | Lanes per plotline or place, ordered by narrative order or by story time |
| Flat | Every scene card in one grid |
| Cast Map | Which characters appear in which chapter |
| Place Map | Where each chapter happens |
Plot Board
The Plot Board is a grid of chapters × plotlines.
- Add chapters and plotlines with the Chapter and Plotline buttons. The Main Plot is always there; new plotlines start as "Subplot 1", "Subplot 2" and so on.
- Drag scenes between cells to move them to another chapter or plotline.
- Choose a Structure to show the beats and acts above the chapters.
- Filter by plotline, character, place or card color.
- Attributes chooses what each card shows: summary, characters, place, story time or beat.
- Flip swaps rows and columns. Choose Stacked or Side by side, collapse or expand stacks, and pick a card size.
- Use Template switches to a beat sheet and adds its beat cards to the canvas.
Outline
The Outline view reads like a synopsis. Chapters are grouped by act in a sidebar, where you can drag them to reorder. Filter by plotline, edit chapter titles in place, and double-click a scene to add a description.
Timeline
The Timeline view draws a lane for each plotline. You can add Subplot lanes and Location lanes with Add Lane.
- Sort by Narrative order, Story time or Structure (beats).
- In story-time order, choose a time scale (Auto, Hours, Days, Months, Years or Fit whole story) and step through with First, Prev, Next and Last.
- Gaps flags jumps of more than a year.
- Marker adds a milestone label, such as "Part 2 begins".
- Links shows the arrows between related scenes.
- Empty Lanes and Unassigned show or hide lanes without scenes and scenes without a lane.
Cast Map and Place Map
These grids show characters (or places) down and chapters across. Each cell holds the scenes where that character appears or that happen in that place. Click a chip to select a scene; double-click to open it.
Toolbar tools in every story view
- Search (⌘F) finds scenes by text. Press Esc to close it.
- Filter shows only one scene type.
- Colour colors scenes by scene type, POV, tension level or beat.
- Auto # numbers scenes by structure or story time.
- Cast opens the lists of characters, places and tags.
- Zoom with ⌘+ and ⌘-, pinch, or ⌃/⌘ plus the scroll wheel. Fit (⌘0) shows everything.
- Export downloads the current view as PNG or PDF.
Right-click a scene to edit it, show it on the canvas, duplicate it, or set its color, scene type, tension (1–10), beat, plotline and place. You can also hide it from the timeline.
Story structures
Pick a beat sheet from the Plot Board's Structure menu, the Story Map's Beat Sheet menu or the Structure picker above the Timeline:
| Structure | Beats |
|---|---|
| Three Act Structure | Setup, Inciting Incident, Rising Action, First Pinch Point, Midpoint, Second Pinch Point, Crisis, Climax, Falling Action, Resolution |
| Hero's Journey | Ordinary World, Call to Adventure, Refusal of the Call, Meeting the Mentor, Crossing the Threshold, Tests, Allies, Enemies, Approach to Innermost Cave, The Ordeal, Reward, The Road Back, Resurrection, Return with Elixir |
| Save the Cat | Opening Image, Theme Stated, Setup, Catalyst, Debate, Break into Two, B Story, Fun and Games, Midpoint, Bad Guys Close In, All Is Lost, Dark Night of the Soul, Break into Three, Finale, Final Image |
| Freytag Pyramid | Exposition, Rising Action, Climax, Falling Action, Denouement |
When you switch structures, WriterMorph spreads your scenes over the new beats. Switch back, and your earlier beat assignments return.
Side panels: Tension, Stats and Story Map
Three buttons open extra panels. Like the timeline itself, each can be docked, floated or minimized.
Tension curve
Rate each scene from 1 (calm) to 10 (peak) and see the curve of your book.
- Drag a point up or down to change a scene's tension.
- Plot by scene order, chapter or word position.
- Show beat markers, an average line, act bands, unrated scenes, and color points by POV.
- Draw the curve smooth, straight or as steps.
- Turn on Ideal Shape to compare your curve with a classic three-act shape.
The header summarizes how many scenes are rated, the average, the peak, the low point and the overall shape (rising, falling, arch, sagging middle or even).
Book Stats
Book Stats counts scenes, plotlines, filled beats, words, average tension and places used, with breakdowns by act, scene type, character and place.
The Needs attention tiles list scenes with no beat, no story time, no character, no place, no tension rating or no summary. Click a tile to filter the timeline to just those scenes.
Story Map
The Story Map shows the whole book on one screen.
- Choose rows (plotline, POV, location or scene type) and columns (beats, acts or chapters).
- See beat coverage at a glance. Missing beats appear as dashed columns.
- Drag a scene into a cell to set its beat, plotline, POV, place or type.
- Right-click an empty cell for New scene here.
Scene details
Each scene card has a Writer Timeline section in the Properties panel:
- Narrative Order
- Scene Type (Action, Dialogue, Description, Flashback, Dream, Montage, Revelation, Climax, or your own)
- Beat Assignment
- Tension Level (1–10)
- Story time (start) and Story time (end): a real date and time, a year, or free text such as "Day 3"
- Time Label, such as "Next morning"
- Location and Era (Past, Present or Future)
- Subplot / Location Lanes
The Cast section sets the POV characters. The first one is the primary POV.
Characters, places, scene types and narrative relations (Cause & Effect, Foreshadowing, Callback, Parallel Events, Character Arc) are managed in Project › Project Settings….
Project views
These views are available in every project, and they are the only ones when story tools are off:
| View | Shows |
|---|---|
| Schedule | A Gantt chart of sections and tasks. Drag across a row to date it, drag bars to move them, and link dependencies |
| Roadmap | Cards and tasks on a calendar, one lane per section, with milestones and today. Plan Chapters… spreads chapters between two dates |
| Progress | Words against target and status, section by section |
| Stats | Words, targets, statuses, tasks, deadlines and what needs attention |
| Chronology | Dated cards in date order, grouped by year and month |
Try it: Open one of the sample projects from Help › Demo Projects, or create a project from a fiction template, to explore every view with scenes that already have beats, dates and tension.