 WriterMorph
Help › Planning
The Visual Planner Canvas
Plan on an infinite canvas of cards with connections, line styles, automatic layouts, alignment, grid snap and fast zoom.
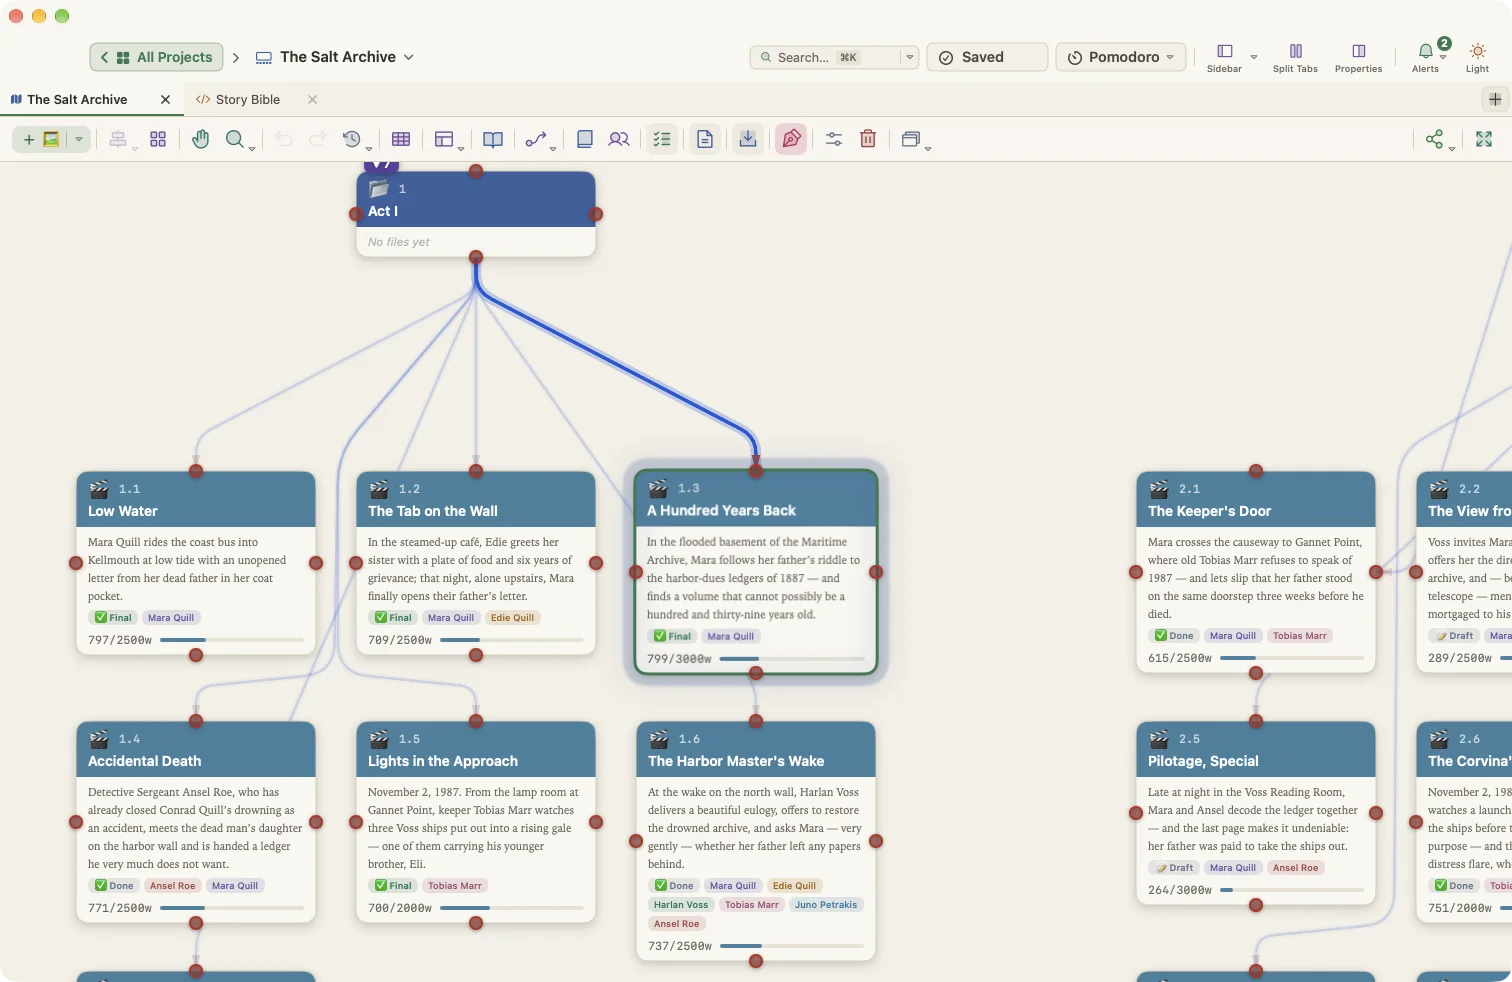
The Visual Planner is a large canvas where every idea, scene, chapter, character, task or reference is a card. You can arrange cards freely, connect them, group them in folders and let WriterMorph lay them out for you.
The canvas and Manuscript Mode are two views of the same cards. Whatever you build here becomes the binder of your book.
Creating cards
- Press ⌘N on the canvas to open the card type picker. Start typing to filter the list.
- Press ⌃1 to ⌃9 to create one of the first nine types in the New Card menu directly.
- Use the toolbar's New card ▾ button. Its left half creates another card of the type you used last; the ▾ menu lists recent types, project types, content, story and task types, cards from templates, and Duplicate selected.
- Right-click empty canvas and choose New card.
- Documents › New Card of Type lists the same types in the menu bar.
Built-in card types
| Group | Types |
|---|---|
| Text cards | Section, Group, Note, Draft, Research, Reference, Introduction, Conclusion, Abstract, Appendix |
| Story | Character, Location, Storyboard |
| Organizing | Folder, Sticky Note |
| Media | Image, Embed, HTML |
| Tasks | Task (with sub-types such as To Do, Research, Review, Edit, Deadline, Milestone and Reminder) |
You can create your own card types too. See Card Properties and Custom Fields.
Editing and moving cards
- Select a card and press Return to edit it, or double-click it.
- Drag a card to move it. Drag its corner to resize it.
- ⌘D duplicates the selection; ⇧⌘D duplicates it together with its connections.
- Delete moves selected cards to the project trash, so you can restore them later.
- Cards with children show a small badge you can click to collapse or expand everything below them.
Right-click a card for Edit, Preview, Send to Manuscript, Reveal in Manuscript, Include in Manuscript / Exclude from Manuscript, Duplicate, Save as Card Template…, Copy, Paste, Connect, Layout Children, Connections and Delete.
Media cards
Image, Embed, HTML and Storyboard cards show media right on the canvas. In the card editor's Media section you can upload a file, paste, or link a web page, a YouTube video, a video file, an image or a PDF. HTML cards open in a code editor with a live preview.
Connections
Drag from a card's connection port to another card to connect them, or right-click a card and use Connect.
Right-click a connection line to:
- choose a Connection Type or Line Style,
- Edit Label…,
- Reverse Direction,
- Disconnect.
Line routing and styles
In Project › Project Settings… (⌥⌘,), under Connections, you can choose how lines are drawn: Curved, Straight or Right Angle.
You can also build a library of line styles. Each style has a name, a color, a line type (Solid, Dashed or Dotted), a width, arrowheads (none, at the end, or at both ends), and an optional label and icon. WriterMorph starts you with styles such as Default, Cause → effect, Foreshadowing, Conflict and Reference. Show or hide each style on the canvas from the toolbar's line styles menu.
Built-in relationship types include Depends On, Blocks, Related To, References, Extends and Conflicts With.
Automatic layout
Choose Canvas › Layout Mode… (⇧⌘L) to rearrange the canvas in one step:
| Layout | What it does |
|---|---|
| Tree Layout | A hierarchical tree (down, up, right or left) |
| Free Form | Keeps your manual positions |
| Horizontal / Vertical | Cards in a row or a column |
| Grid Layout | An even grid |
| Radial | Rings radiating from a center card |
| Timeline | A horizontal line sorted by date |
| Mind Map | A central card with branches to the left and right |
Save an arrangement you like under Saved Layouts and restore it later. To lay out only part of the board, right-click a card and use Layout Children.
Align and distribute
Select two or more cards and open Align Nodes in the toolbar:
- Align Left, Align Center, Align Right
- Align Top, Align Middle, Align Bottom
- Distribute Horizontal, Distribute Vertical
Grid snap and canvas size
- Toggle Grid Snap in the toolbar.
- In Project Settings › Canvas, set the grid size and the canvas size (Small, Medium, Large, Huge or Custom).
Backgrounds
Give each planner its own background: the theme default, a solid Colour, a Gradient, a Grid, Dots or an Image (fit, fill, tile or center, with opacity and blur). Right-click empty canvas and choose Background, or open the background settings in Project Settings.
Zoom and pan
| Action | How |
|---|---|
| Zoom in / out | ⌘+ / ⌘-, pinch, or the mouse wheel |
| Fit to Screen | ⌘0 |
| Zoom to Selection | ⌃⌘1 |
| Pan | Hold Space and drag, drag with the middle mouse button, use the Hand tool, or scroll with the trackpad |
Tip: In Settings › Behaviors, you can decide whether dragging on empty canvas pans or draws a selection box, and whether the mouse wheel and trackpad zoom or pan.
The Outline panel
Press ⌘L to show the Outline panel next to the canvas. It lists every card as a tree.
- Filter by title or summary, or by property, for example
status: draftortype: character. - Show only the first levels of the tree with the level buttons.
- Reorder with ⌥↑ / ⌥↓, indent with ⌥→ and outdent with ⌥←.
Exporting the board
- File › Export › Canvas as PNG… or Canvas as PDF… saves an image of the board.
- The planner toolbar can also download the board as PNG, JPG, PDF or JSON, or copy it as JSON.